These notes were written by our member Adrian Prescott for The Link, April 2008
Painting and lining can, by some, be considered a ‘Black Art’. I have been painting and lining models for a good few years and now do it professionally, so I need to get the best possible finish. Let me begin by saying that I am no Alan Brackenborough or Ian Rathbone, but I take my inspiration from them and try to emulate their working practices where possible. Ian Rathbone quotes the three ‘P’s’ as his motto; Patience, Practice and Perseverance. I add another significant ‘P’; Preparation with other no less important P’s such as Primer, Paint and Pen. Here are a few tips to help you to overcome some of the most common problems.
Preparation
It is vital to know that you will never get a good paint finish on anything, let alone your latest painstaking creation, unless the surface is adequately prepared. You cannot smooth out a rough solder job with paint any more than paint will properly cover file marks. It is said that in the glory days of the pre-grouping era the most highly skilled men were employed on the surface preparation of rolling stock as it was the most important part of the process. I have little experience of painting wooden models, but I consider that the basics are the same as any good quality woodworking job; adequate rubbing down, filling of grain and blemishes, rubbing down again and a full coat of the appropriate primer. Never forgetting that any knots in larger sections should be sealed with shellac knotting. Metal models, be they brass, nickel silver, whitemetal or tinplate must be clean and grease free before any attempt is made to apply paint.
After every soldering session I clean the model by washing it in ordinary Flash floor cleaner, rinsing it well and leaving it to dry overnight. Other modellers use Cillit Bang and Shiny Sinks to achieve the same result. Many articles extol the virtues of Fairy liquid or cream cleaners like CIF. I avoid these like the plague; Fairy liquid has lanoline in it and so is inherently slightly greasy and any of the cream cleaners have the ability to leave a faint chalky deposit on the model. The whole idea is to neutralise any flux and get rid of greasy finger marks etc. On the subject of flux my default position is to use phosphoric acid flux applied with a cheap paint brush. I will also use Powerflow at times particularly when I am soldering next to steel and don’t wish to risk any rust. However, I always water the Powerflow down quite significantly so that it almost drips into the joint. This flux is then removed with a good scrub with meths before the standard flash cleaning. Stray solder must be scraped away and any gaps should be filled with either solder or a proprietary filler such as Stucco (available from Eileen’s Emporium or Branchlines). Very fine wet and dry (used wet) may be necessary to remove blemishes and stray file marks.
The whole model now needs a good going over with a fibre glass scratch brush. This will also remove thin areas of stray solder. Follow this with the usual Flash wash and a rinse in warm water. You should try not to use bare hands after the final cleaning; I use surgical gloves bought in boxes of 100 from Squires. Then place the model in a dust free area to dry completely. I place my models under clear plastic propagator covers obtained from the garden centre, but anything suitable will do. Don’t forget that any closed voids on the model won’t be anything like as closed as you think and water will get in, but take ages to dry out. The trick is not to be in too much of a hurry and give the thing a good chance to dry out properly. You will now have the joy of checking it to find the inevitable stray fibre glass bristles. One way of helping this process is to use a hairdryer on maximum ‘blow’ but no heat to blast any fibres away. The important thing is to check the whole model, particularly inside corners and behind springs and handrails etc.
Any parts that will be bare metal once finished, such as safety valve bonnets etc should, wherever possible, be left off until the painting is complete, but if that is not possible these must be masked to avoid the aggravation of cleaning the paint off afterwards. I use Humbrol masking fluid applied with a small brush. You can clean the brush with cellulose thinners, which has the effect of making the masking fluid come off in a blob.
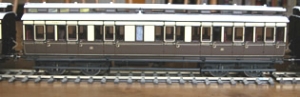
 Whilst we are on the subject of removable bits, it is well to think about the painting and lining of our model before we have even begun to build it. This all part of the magic word preparation. You need to consider how you will get at certain parts for lining, where it would be sensible to have separate parts to ease painting and avoid difficult masking and even perhaps using parts of a model whilst they are still flat shapes to create templates for making your own lining transfers.
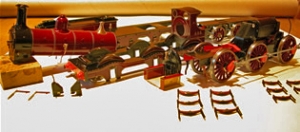
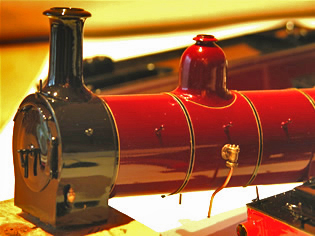 Just to illustrate this I recently built and painted a 7mm Slaters Kirtley 0-6-0 goods engine in full 1905 livery. In order to do all the lining necessary the tender tank was separate from the platform and the six outside springs were also added once painted and lined. The engine consisted of inside frames with pre-painted and lined wheels, motor etc, the outside frames with the platform and cab attached were also separate and the boiler, smokebox and firebox were another unit.
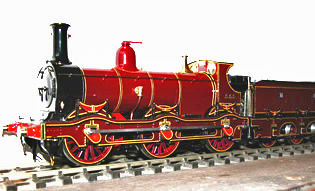 Once again the six springs were added afterwards along with the polished safety valve bonnet. This all meant that I was able to paint and line the whole thing quite easily and did not have to resort to making any transfers.
Primer
Primer serves a very important function on our models; it helps the top coat ‘stick’ to the metal and also acts as an undercoat to help us recognise any minor blemishes that we have missed earlier. Generally, plastic models do not need primer, but a waft of it will help to identify blemishes just the same as metal models.
On metal models I use self etch primer, thinned with one measure of the special thinners and one measure of cellulose thinners to one measure of the paint. I use Precision single pack, but others are available. I do not generally use car primer as it is designed to lay down a thick coat over a car panel, which is massively larger than our creations. It is very easy to put far too much paint down and obliterate the detail you have so lovingly included.
When you are ready to paint take your model out from under the cover and give it a good brushing with a clean dry half inch brush to remove any stray bits of dust. I use a good quality airbrush with a proper compressor. However, I used a £5 Humbrol airbrush with compressed air cans from Badger for many years – until I turned professional and the work justified the expense – so don’t feel you have to fork out large sums just to get a good finish. Once you have got used to spraying your models you will be unlikely to revert to major brush painting.
The trick with primer is that it should be thick enough to cover the metal, but no more. Self etch primer needs 24 hours to cure so put the model back under the cover and leave it. We now come to the vexed subject of Paint.
Paint
There are various types of paint available including cellulose, acrylic and enamel. I will talk about Precision and Humbrol enamel paints, which are what I use.
If the model is to be lined, or transfers are to be applied I use gloss enamel. The only exception is goods vehicles, which I usually paint in either satin or matt enamel. I use gloss because it is easier to line on (and correct errors on) and it takes transfers much better, particularly waterslide.
For spraying I use a 50/50 mix of well stirred paint and ordinary white spirit. Be careful not to put too much paint down, but equally make sure that you have a full coat on with no bits missed. Inside corners and behind handrails are favourite places to be missed. The ideal you are seeking is that you are just on the verge of getting runs in your paint, but it is just holding itself together. It is far better to stop and put it away under the cover and come back tomorrow and recoat where necessary than risk a run. Explaining how to spray paint a model is a bit like telling you how to ride a bike, but once you have learned the balance you will never forget how to do it!
Again, we have to think about the first P; Preparation. Unless it is a plain black engine, it is important to think about the ease of masking off one colour whilst another is sprayed. In general terms I paint the black parts of an engine first as the smokebox, cab roof and platform are easier to mask than the boiler, splashers etc. It is important to make sure that the first paint is fully dried before you go near it with masking tape, this can mean several days. Remember that there is no point in rushing the job now. I use Tamiya tape as it is low tack, very thin and available in several different widths. If I need to add paper to a mask, such as covering a carriage side whilst I spray the roof I attach the paper to the Tamiya tape with ordinary B & Q masking tape. Just make sure you never use that directly on your model as it can easily pull paint off.
As soon as you stop spraying your second colour and before you put the model away you should remove the masking carefully. I do this now for two main reasons; you can immediately see if there is any ‘creep’ of the new colour under the tape so that you can remove it and secondly it reduces the step between the two colours and prevents the tape pulling the new paint off along the edge, as it could do if it was dry. Getting rid of the paint creep is exactly the same as correcting flaws in lining so we will deal with the subject at that time. If you have used Humbrol masking fluid at all then that should also be removed carefully before the main paint has had a chance to form a skin. Again you could damage the surrounding paint if you wait for it to dry before removed the masking fluid.
Once again put the model away and if all is well it can be left for a week to harden properly before lining. The next part can strike terror in the hearts of otherwise stout men, Lining and the use of ‘The Pen’.
Lining pen
I do my lining with a draughtsman’s bow pen and I use neat, thick Humbrol gloss paint. I own, and have used, Bob Moore’s lining pens, but I can get much finer lines with my bow pen. I also have a compass bow pen that it not only used for circles like wheel tyres, but is also used for edge lining such as cab fronts, tender frame cut outs etc. The secret is in the tip of the pen. If your pen will not draw with undiluted Humbrol gloss then the tip of the pen is not right and it must be dressed to make it work correctly.
My favourite pen is of an unknown pedigree and when I got it the blades were so badly set that they were actually out of line with each other. Now that I have dressed it I can draw very thin lines consistently. Equally price is not everything as I also own a Haff bow pen which today would cost about £80 and I can’t get the same results out of it because the blades are too long and flexible. Ideally you need shortish stiff blades to get the best results. The tip should form a smooth parabola and the blades must touch only at the tip when the adjusting screw is closed. When looked at end on the blades should be as sharp as a blunt kitchen knife; we don’t want to cut the paint but we don’t want to make thick lines, there should be no sharp edges anywhere. All the dressing and adjusting must be done to the outside of the blades with the insides only getting a polish with crocus cloth if necessary.
I mentioned the use of thick Humbrol gloss paint for lining. Matt paint has talc in it so is inherently gritty and will never flow as well as gloss paint. However we don’t want our paint to spread when it leaves the pen so it has to be sufficiently thick to stay just where it is put with no tendency to flow sideways. A brand new, properly stirred tin of Humbrol is too thin and must be allowed to lose some of its solvent before it can be used. One method is to carefully open the tin and discard the thin top part and use the rest of the tin. The paint should just about hang on a cocktail stick and be quite treacly in consistency. You only need a single drop in the pen and once you have adjusted the blades you will be able to draw beautiful thin lines as the thick paint actually pulls itself out of the pen once the line is started. Don’t press on with the pen, it’s not like using a Biro, just let the paint emerge as you steadily draw your line.
OK we are flushed with success but we can’t do the corners on our tender lining with pen, so what do we do? The use of a gloss paint body colour ensures that we can correct over length lines or minor blemishes easily. Just take a good quality fine sable brush, I use a Windsor and Newton Series 7 ‘000’ size, and dampen it with white spirit and dress the line back to where you want it to be. It is vital that you do not have a wet brush as it will cause the line to flood sideways. This same technique is used to remove stray colour after removing masking tape when spraying. I use the same type of brush to carefully brush in the curved corners. Do not buy fine brushes from hobby stores; get them from a proper specialist art shop and they will last you if you treat them well. Currently the brush described above costs £7.20 and it should last you for years.
Transfers
Another aspect of lining and use of the pen is making your own transfers. You will note that I have made no mention of using commercial lining transfers. Whilst I did use them many years ago I find them such a job to get straight and can get much finer, and quicker, results from my pen. However there are some areas that can be very difficult, if not impossible, to line in the conventional way and we have to resort to transfers. Boiler bands and tank fronts are two obvious ones.
When you were spraying your body colour on the engine it is a good idea to spray some plain transfer sheet with the same colour. You need to spray a fairly thick coat as the transfer itself is only a very thin layer of varnish and has virtually no strength. The transfer paper I use is called APT and I buy it direct from America from a firm called Aircraft Hobby. It is also available from Hannants, but be aware that they also sell some ‘Plain Decal Sheet’ that is made in Poland and is absolute rubbish.
Clearly boiler bands are laterally very thin and must not be wider than the actual bands you are attaching them to, but in many other cases the transfer can cover a much bigger area and will therefore be much easier to handle. It just takes a bit of thought, and there we are back to Preparation again.

Varnish
OK I know it’s not a P but never mind! The main function of varnish is to protect the surface underneath and indeed that is particularly useful if transfers have been involved, but we have a secondary function and that is to give us the lustre that we want as a high gloss finish can look a bit false on a small scale model.
I use Ronseal exterior ‘Does what it says on the tin’ varnish and this is usually a 40% varnish and 60% white spirit mix wafted on quite thinly. I use the satin and the gloss but don’t touch the matt as it seems to be very gritty. Do not use the water based version as it is alien to the rest of the paints used and is likely to react adversely.
All you need now are the final three P’s, Patience, Practice and Perseverance.
Patience
You can’t hope to get good results if you are in a hurry or stressed, so be calm and accept that you will muck it up sometimes, I still do so I just get out the white spirit and take it off before it dries.
Practice
Spray a fairly good sized piece of metal with a mid colour gloss paint and practise drawing lines on it, over and over again. Wipe them all off before it dries and do it all again. Dig out of the cupboard or buy at a show an old metal bodied engine and spray and line the body over and over again. Periodically give it a bath in Nitromors and start all over again.
Every time you go to line a new model test the pen on your flat plate to make sure it is working as you want and the line thickness is OK.
Perseverance
Don’t give up, we’ve all fallen off that bike a good few times before we got the hang of it.
That’s it for now, I hope I’ve given some of you a spark of courage to have a go. Good luck.
Note: Adrian died from a stroke on 10th December 2013. He will be sorely missed.