Lightweight baseboard construction
The tale of a lightweight ‘shunting plank’ by Dave Booth
In 2009 after sixty years spent trying to improve my model railway skills, I started to realise that any skills I had developed were slowly being eroded by age.
I therefore took the decision to build a layout which could be quickly folded such that the baseboards made a coffin-like box containing all track, buildings and scenery; a box that I could carry single-handed and which would fit into the boot of my car. The locos and stock would store into a stock box designed around cassettes. The mains transformers would all be housed in a floor standing box with the low voltage electrics all being built into the base boards; one flexible cable between power unit and layout and one from power unit to the mains, these leads being part of the floor standing box. The hand-held controller (not DCC) would plug into the layout.
Those ideas evolved from my desire that the layout be capable of operation and transport in one small car by one person, and that it should involve the absolute minimum of boxes and ‘things’ essential to the layout but easily forgotten! Ideally one layout; one electric box; one stock box. I have achieved that with the exception of a loose road overbridge designed to hide the baseboard joint, which it can only do when the layout is unfolded and ready for operation. Also the hand-held controller is a loose item. This means that my loading list is only five items.
The problem was what material to use for the baseboard construction. At that time polystyrene foam for DIY stopped at ceiling tiles and even were I to achieve good enough bonding to plywood it would probably not work with a sandwich of thin, individual tiles. Aerosol cans of expanding foam were very expensive and could I ensure its adhesion and containment to, and within two sheets of ply? I let the idea go.
I found that heat-insulating foam sheet was ‘extruded’ polystyrene, not ‘expanded’, but it was expensive. However if you purchased from one of the large DIY companies where it was listed as “wall insulation” it was much cheaper, probably due to government grants on insulation materials.
The material I decided to experiment on was sold under the title “SpaceBoard” and for just under £4 I could have what I thought was a 4’ x 2’ x 2” sheet. Just one of these would allow me two baseboards 4’ x 1’ and an 8’ x 1’ layout. Actually the sheet was 1.2m x 0.5m but I was back at home by the time I realised its true width.
Next I mocked up a box that would fit my car boot and found that I could house 3’ x 1’ x 1’. That meant that I could have a six foot long layout, 1’ wide – a bit longer if I could incorporate the hinged end board needed in order to make up the box.
This was when I discovered that my sheet was not 2’ wide but only 0.5m (19.7”). If I cut this sheet down the middle I would end up with a baseboard less than 10” wide, which would introduce too much restriction to my track plan. At this point I decided to build this layout to metric dimensions, buy another sheet and go for two boards each 1m x 0.3m x 0.3m. This would actually make my layout about six inches longer because of the 3” or so difference between 3’ and 1m.
Before I proceed, let me remind you of the strictures I laid down for this project:
- One-man operation with set-up/breakdown achievable in seconds rather than minutes.
- One-man transportation between car and site.
- Restricted number of ‘parcels’ involved in transport
- Easy to fit in a small car boot
I decided on 2” thick insulation foam for my main baseboard material but I have also used a lot of foam board, cadged from the local supermarket which was throwing some away after using it for display boards, for buildings, scenery formers, walls etc. The layout, complete with all track, electric wiring, point mechanisms and a mimic diagram at the operator position, weighs just below 7lbs or 3.2 kg. There is an operable length of 2.25m or 7.4’ and a maximum width of 300mm.
 OK then, here’s how I did it.
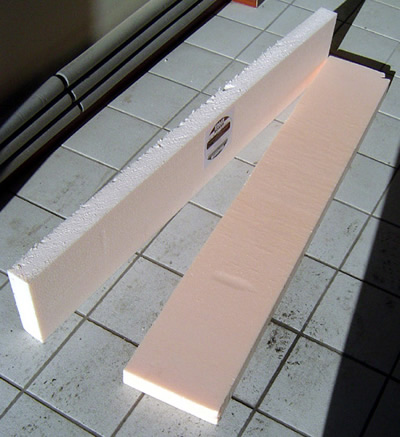
The first picture shows the basic material, extruded polystyrene foam as used for domestic heat insulation.
These are the offcuts from the two sheets I purchased. Each is about 1200mm x 200mm x 50mm. Included just so you know what it looks like if you propose to copy the idea.
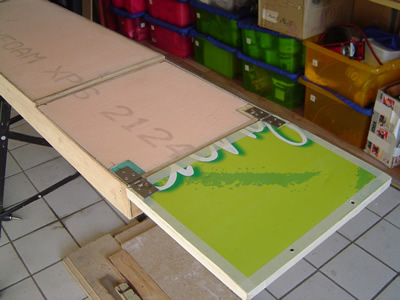
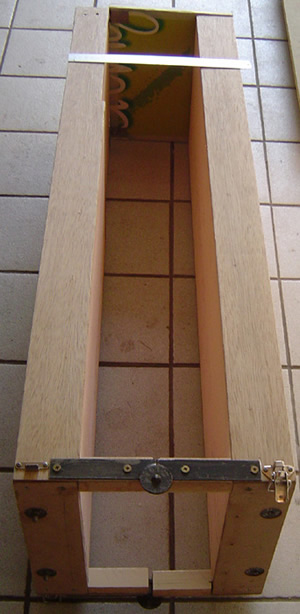 This is the completed baseboard, or the three boards folded into the box that was designed to fit into our car boot.
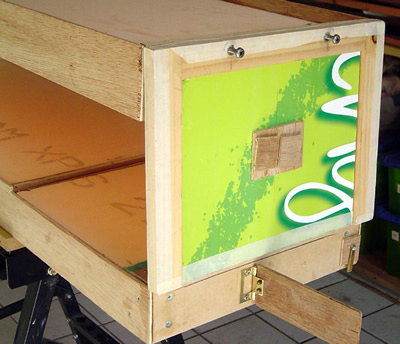
The extruded polystyrene provides the non-twisting, non-warping strength of the completed board but some timber or MDF board is required as protection against the foam crumbling under compression or rubbing, and as somewhere to screw-fix hinges, toggle clasps and dowels.
At the near end can be seen the hinges and the wooden pillars to which they are fixed, as also is half a toggle clasp on each side, and the locating dowels.
At the far end is a 12” steel rule to give a sense of scale.
Behind that the baseboard made of foam board and strip timber which forms the joint between the boards.
Hinged to one board and bolted to the other when the boards are folded, it completes the box and it also increases the operable length by 0.25m.
 This picture should make the above sentence more clear.
The supermarket foam board has a structural support on all edges.
This is 20 x 6mm pine, pinned and glued to the foam board, whose edges are protected by draughting tape.
The instrument head 6mm bolts screw into “pronged ‘T’ nuts embedded into the baseboard’s end-sheet.
Also in this picture are the wood screws through side and end-sheet and which fasten in a timber block to which is screwed one of the two back-flap hinges for this small baseboard extension – part of the hinge can just be seen. I shall from now refer to this small extension board as “the baseboard flap”.
The bit of plywood on a hinge and the two pieces on the ‘flap’ act as a simple cantilever system to support the flap horizontal and level with the hidden siding area which is lower than the track-bed in order to accommodate the stock cassettes. This change in level shows clearly in the picture.
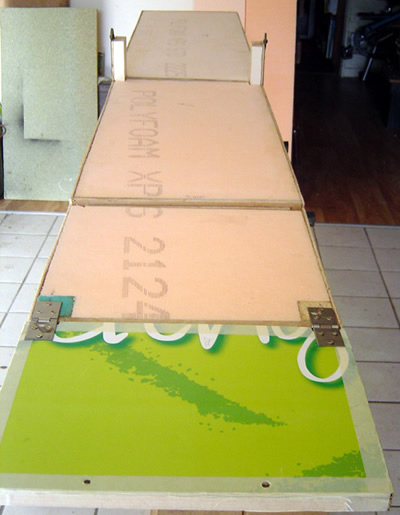 Here we see the total length (2.25 metres) and width (300 mm or 1 foot) in full-length view.
The pasteboard hinges on the joint between the top two boards are screwed to timber blocks which were later reduced in height.
On the next board the step-down in level can be seen. This shows the extent of the hidden sidings, an area actually doubled by the ‘baseboard flap’.
 This is a clearer view of the step-down and the back-flap hinges with the timber blocks to which they are fixed.
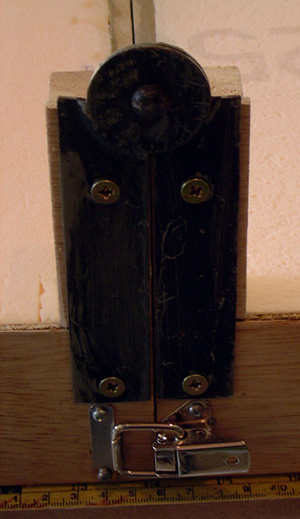 Here is a close-up view of the hinge system between the two main baseboards.
For scenic reasons the timber pillars to which the hinge is screwed were cut back to be about 12mm above the top screw.
This move allowed the removable road bridge to sit lower, and the road level to be lower than the retaining wall level.
Construction notes
In my initial research I read of people having difficulty in sticking the extruded polystyrene to other materials. My baseboards were built in 2010 and the only adhesive I used was a good quality, outdoor PVA (I think it was Screwfix own label). I’m currently using “Evo-stik weatherproof wood adhesive – RESIN W,100% bond”. I have had no problems with adhesion over three years after adding track, scenery, wiring etc. The boards have been folded & unfolded well over a hundred times. By all means use something more expensive if you wish but my experience is that it will be a waste of money!
One tip that I had not heard of but which I have used many times is that foam products can be easily and very successfully ‘nailed’ together using cocktail sticks! I have done this for foam board joints for years and I did it when sticking the side-sheets to my foam insulation. For timber to foam, drill a 2mm diameter hole in the timber, smear PVA on the cocktail stick and push the stick into the foam; trim stick after the PVA has set. You will of course have run PVA between timber and foam first! Sounds daft but I assure you it works and adds strength to the joint as well as holding things in the correct location while the glue cures.
My side-sheets are 3mm good quality ply cut to 70mm wide. The top edge is flush to the top face of the foam, leaving the bottom face of the foam 20mm above the bottom edge of the side-sheet. That’s plenty of space for wiring etc but insufficient for point motors. Remember my limitation factors! When the baseboards are folded the scenery and buildings have to ‘jig-saw’ into the space between them and the folded height must not be greater than 300mm. Side-sheets were stuck and ‘nailed’ to the foam as just described.
The end-sheets are 10mm MDF. The extra thickness here is needed to house the locating dowels at the centre and the pronged ‘T’ nuts at the end.
Timber pillars for the pasteboard hinges were made from 28 x 21 mm timber, originally 150 mm long but later shortened. A slot in the foam is needed and mine were half-jointed to the side sheet prior to gluing the side sheet to the foam.
Having reached the stage of the photographs shown above the whole top surface of the boards was covered in 3mm cork. I used cork tiles because I had some in stock. Finally when all was dry, it was all lightly sand-papered and then had two coats of clear varnish. N.B. no varnish on any showing foam! Now it was ready for tracklaying and scenery.